- published
- reading time
- 19 minutes
  :                                                                        :
  –┼──────────────────────────────────────────────────────────────────────┼–
+–─┘                                                                      └─–+
                        Radare2 vs Ghidra
: :                                                                        : :
┌─|────────────────────────────────────────────────────────────────────────|─┐
└─│──┐– –────────────────────────────────────────────────────────────– –┌──│─┘
┌─┘  |                                                                  |  └─┐
│:   :                                                                  :   :│
: :
–┼──────────────────────────────────────────────────────────────────────┼–
+–─┘ └─–+
Radare2 vs Ghidra
: : : :
┌─|────────────────────────────────────────────────────────────────────────|─┐
└─│──┐– –────────────────────────────────────────────────────────────– –┌──│─┘
┌─┘ | | └─┐
│: : : :│
Introduction
The most obvious way to begin reverse engineering is to understand simple binaries. This is usually done by solving crackmes. Crackmes are small programs where you need to find a secret or understand the logic based on a binary. The binary, as the name suggests, will be in binary format, so 0s and 1s. But we cannot really read binary or even machine code very well. The next step would be assembly language. Assembly language is an essential part of static reverse engineering. To convert binary code to assembly you need a disassembler. It is also possible to use a decompiler to convert the code to a higher level language, such as C.
In order to do static reversing on Crackmes, we looked at different software that would allow us to disassemble or decompile the binaries. We found that many people recommended Ghidra or Radare2 (there were also some other tools mentioned, such as IDA, but these are the most common free tools). At first, it is unclear what the difference is and why it is recommended to learn both when it sounds like they do almost the same thing. We both had different preferences, so we each picked one and did the Crackmes.
Spoiler: Very soon it was obvious what the differences were and why both were very useful to know, which ended with both of us using both tools.
Ghidra
Ghidra is a free alternative to IDA. It is described as a “reverse engineering suite of tools” and is developed by the NSA. Ghidra is mainly a static reverse engineering tool with a decent decompiler. It has a GUI and is mostly intuitive. There are some nice advantages to using Ghidra over Radare2 and some disadvantages.
For me, I have had some experience with Ghidra before. I just tried some very simple Crackmes a while ago. And I remembered this and my time learning Assembly in university and I knew that learning reversing is not going to be easy. Especially, with the goal of working with malware. I focused heavily on the idea of static analysis, so I wouldn’t accidentally screw up my system.
Ghidra was a good choice for a soft start. It has a GUI and is a disassembler, which means you can ignore Assembly at first. This is really nice for a smooth start and gives you confidence. The features, such as easily seeing all functions and moving through them by clicks and changing variable names, are very nice for beginners. Even with very large binaries, this allows you to keep a nice overview and work very quickly. It is a very handy tool for static analysis.
However, at first I didn’t like the GUI very much, but later I found out that it is possible to choose themes that allow dark mode. I do have some issues with scaling, were symbols are just to small and the font when changed is really awkward, though. Now, if someone did a gruvbox theme - my preferred color scheme for pretty much everything - that would be perfect.
I also had some problems with debugging. While not my focus in the beginning, debugging is really nice for the Crackmes and to learn more about the program and also how assembly works. Ghidra does not have a native debugger, it uses common debuggers for the different platforms. On the one hand this is nice, because no matter if exe or elf file, you can run it by connecting to the right debugger. But I couldn’t really get it to work.
Finally, one positive aspect of Ghidra is also a negative one. Although I do not have to concentrate on Assembly, I quickly found myself not looking at it at all. I believe that actively paying attention to Assembly - even if the decompiler does a good job - is important for reversing. Otherwise it is going to make the task harder later on. Similarly, as mentioned above, other concepts such as program flow, stack canaries, stack and heap, entry address, and much more can mostly be ignored. This is great for the beginning and when you are already very familiar with all these theoretically and practically, but for the learning process it might be too tempting to skip things with Ghidra.
Ghidra Summary
- GUI
- easy to get started
- good for keeping track of large binaries
- good decompiler
- rather ugly GUI, but themes
- no Assembly needed
- tempted to ignore Assembly, and will do so
- may not learn underlying concepts
- debugging issues…
Technical Aspects
I don’t want to go into detail on how to use Ghidra because there are good resources out there. There is a tutorial on the Github page, there is also a book you can buy. However, here is a picture of what Ghidra looks like when opened with a file to analyze (and dark theme, of course).
![[ghidra.jpeg]] As you can see, there are a lot of things you have at once. Of course this can be changed. I have highlighted some of the things I find most useful. At the top, we can let Ghidra generate a block or code graph to better understand the flow of the code. On the left, Ghidra lists all functions. The two large views in the middle are the most important. On the left is the assembler code and on the right the decompiled C code. A very nice thing is that in each of these you can put commands inline, before or after. It is also possible to change any of the variable and function names in the C code for better understanding.
My Comparison to Radare2
After that I decided to try radare2 as well. And I found the tool very complementary to Ghidra. And it was worth to learn it. Radare2 is a command line tool, so no nice GUI. This gives it a bigger learning curve at the beginning. However, it does make you feel a bit more accomplished once you learn how to navigate and use it.
Radare2 comes with a debugger, no additional setup to mess up. It does disassembly, so these two practically lead to learning the aforementioned Assembly and addressing/pointer, stack, heap, registers etc. It made me feel like I understood much more of what I was doing/what was happening at the end. But I also feel that it is much easier to lose track of things on larger projects.
One thing I found was that radare2 has a Ghidra decompiler plugin that allows you to decompile separate functions. However, I found that the output was not as nice as in Ghidra. But maybe that was because I was already used to Ghidra.
Radare2 Summary
- no GUI
- CLI makes you feel like a real pro
- good debugger
- need to learn Assembly and other concepts
- will ’teach’ Assembly and other concepts
- confusing/complex for large projects
- bigger learning curve at the start
- Ghidra decompiler plugin (which is not as good as the original)
My Conclusion
In conclusion, although the tools may seem very similar, this is not the case. You can use both to solve the Crackmes and many other problems. They are used in very different ways. In the future I will most likely use Ghidra for larger projects where I need a bigger overview and pure static analysis. While radare2 is very nice for learning concepts, understanding small binaries or sections and their assembly and debugging tasks, so a more dynamic approach. Overall, I am happy to have started with Ghidra and to have looked into radare2. Out of the two, I probably still prefer Ghidra.
- o3wl
Radare2
Greetings! Today I’ll talk about my experience using radare21 during a wargame. I had access to some files, written in C language, and those files aim to intuitively teach how to use disassemblers/debuggers in order to do some reverse engineering on them. Me and o3wl thought about tools which could be used to do it as a first step. Well, obviously my choice was radare2 because it is in the title of this article but also because personally I do like CLI-based tools. On Linux-based OSs, I can perform the major part of my tasks in the terminal and it turns my workflow more practical, so when I search for some new tool to add to my daily use, I always go through some more CLI/terminal-oriented tools. Also, because it looks better than Ghidra but this is just my opinion.
Well, do not expect a very detailed description of radare2, because for this you might have a book that serves as documentation itself2 and a bunch more GitHub repos or blogs with this aim, which map fancy commands and custom setups for those who might like to play with it, and I really recommend that. Since we have a few steps to follow during a reverse engineering flow, what you can expect here is how the experience of using it was and in which situations it can be well applied.
How was working with it:
To talk about using radare2, I must summarize how those files were organized. Basically, they were files with graduating difficulty levels, each file representing a level in ascending order. The files were written in such a way that you should type a number that was somehow hidden in the code, and you should figure out how to find it using whatever means you want and then “unlock” the next level once you got the “Access granted” string. It’s worth mentioning that using the Stack Pointer was not a valid solution. Yes, it works, but you kind of lose the “cause” without facing the challenge of each specific module, and this is not my goal.

Things said, I would like to point out that it is not an easy experience working with radare2 at first glance. You must care about too many things, like top commands to have “in your blood” in order to be fluid. Yes, we do have a lot of tutorials and so on teaching how to use it in a proper way, but even doing this is onerous. Filtering such information might require time just to learn the new syntax niche. It helps if you are familiar with CLI-based environments, mainly Linux ones, where you can type $man radare and spend some time reading it with the documentation split beside on your screen.
For instance, compared to Ghidra which you have just to load the project and sneak around with your mouse (knowing what you are doing), it is way less attractive in terms of practicality. Continuing on this topic, it seems not user-friendly as well once you don’t know much about Reverse engineering. After invoking the radare2 bin and it loads the file at some memory address like this:

As you can see, in the figure above, I just called the radare2 binary with a file named capa which is a 64-bit executable, and suddenly a probable memory address appeared along with some WARNings due to my setup. But if you go further, you might realize that things start to make sense once you get the concept behind it.

So, normally radare2 “stops” the workflow analysis at the entrypoint of the file and, in fact, it is a memory address. Besides this, you have these (sometimes philosophical or informative but always funny) phrases and then things start to “click” in a good way. If you go even further, you might perceive that you are able to load a file into memory in diverse manners. So, whenever you want to know something about the tool itself, you might face the duality of spending some time on it versus “being rewarded” to know more about it until it starts to become natural.
Additionally, from a holistic point of view, radare2 is loading a file into memory. Let’s say that conceptually Ghidra does it as well, but radare2 does it by adding dynamicity to it because in the same way that radare2 works as a disassembler, it can also perform as a debugger. This means that you can provide inputs during your analysis and see how it behaves, which is awesome for a hybrid analysis. You can do a static analysis and then provide some input to it, and at some point, you will be able to see where it jumps in the memory, which piece of code will be executed next based on the stack pointer, etc.
Radare2 is very accepted by the community for reverse engineering and almost everything that you would want to know about it, you might find just by googling. But reports like this are not that common, like in which situations to use it, experiences using it, things that involve personal experiences. As a friend of mine always says: “The more functionality, the more things that can break down”. I would switch the “break down” for “be aware” because it is exactly what radare2 is. It is not a tool for shallow usage, at least in my opinion. But it is really fun because once you become capable of managing it during a hybrid analysis, you can dynamically see the workflow of how a file is loaded into memory and how the OS interacts with it directly through a terminal.
Whether you have time or disposition to spend some time learning about the tool, I must say that it is worthwhile knowledge, but this strongly carries my bias. As Socrates said to “know thyself”, I would add “know your tools as if they were thyself”. At least the basic concepts of how files are loaded into RAM memory, how the OS switches contexts, how it organizes the program flow over the memory and so on are part of the basic concepts that make you more aware of how to properly use a computer as a tool. I’m assuming if you’re interested in topics like this, you use your computer at least as a hobby. Amazingly, radare2 is a really nice tool to see those things in practice.
More technical details about the tool itself during its usage:
Analysis
When you first load a binary into radare2, generally I like to work with two approaches: $a for code analysis made by radare2 itself or walk around the code by yourself seeking some juicy stuff. The $a command family is part of radare2’s analysis capabilities. The entry point and basic section information are available, but the deeper structure of the code remains obscure. However, executing the $a command identifies and flags functions, establishes cross-references linking code and data, recognizes strings, and maps out symbols and imports. For more thorough analysis, we might use $aaa or even $aaaa, though these can be time-consuming for larger binaries.


Flags and Strings
Flags in radare2 are essential for navigation. We can list all flags with $f, or switch to a specific flag space with $fs:
[0x00401000]> fs strings
[0x00401000]> f
0x00402008 7 str.Access_granted
0x00402015 8 str.Access_denied
To search for strings, $iz lists strings in the data section, while $izz searches the entire binary:


We can also find cross-references to strings using:
[0x00401000]> axt @@ str.*
Seeking and Disassembling
To move through function signatures, the ($s)eek command is made for:

As you can see in the figure above, we loaded the file within radare2 and it was probably at its entry point, but after typing $s main, the marked address just changed to the exact point where the main function is loaded by radare2 in memory. Combined with this, radare2 has disassembling commands like $pdf @ main, and it will disassemble the whole function based on the method signature which you provided:

Probably at this point you got the feeling. Yet, still interesting keep talk about radare’s functionalities, time to move on and focus on what can be done with it.
Debugging
The debugging in radare2 is the strongest feature compared to Ghidra. Ghidra does have at least a GUI, so in a scenario where you’re not familiar with both tools, doing a static analysis starting from the very same point of knowledge with Ghidra might be more profitable initially, because the GUI is more user-friendly and guided. But with time, it becomes just personal preference, with radare2 sometimes being best applied, mainly during debugging.
For example, during a module solving, the idea consists of reading the code, following the flow of code execution, and finding the final result of a variable. The main challenges consist of sometimes following the code’s flow, which might not be that simple, and things like checking register values in radare2 are way easier to do than in Ghidra.

In the code above, after analyzing the code’s flow a bit, I realized that it was storing the “final” value in the edi register before an if statement which enters the Access granted string. Instead of going through the whole code and seeing what happens with the variable during the code execution, what if I just set up a breakpoint at the right moment when the code calls the value inside the edi register and intercept its value to check which value is there?

If you are capable to see a little b besides the memory address of the if statement its a break point. After hit a break point I can check the value inside of edi easy like this:


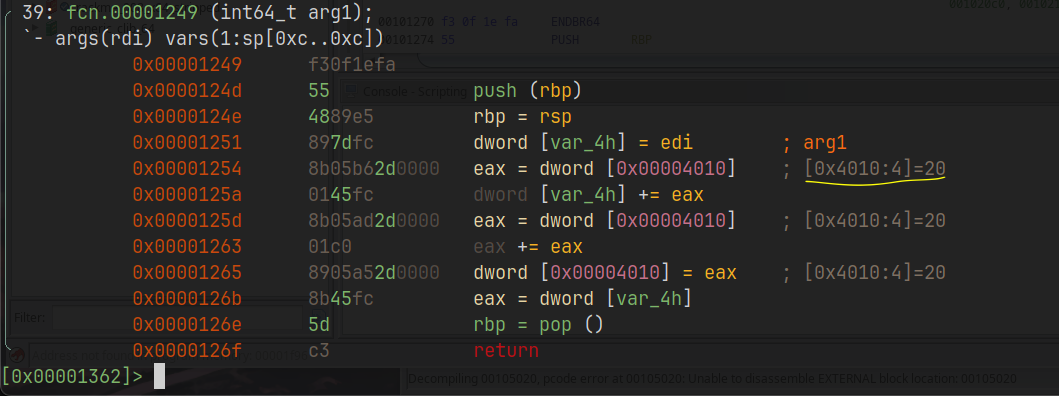
But life is not only flowers, and sometimes we’re not lucky enough to find code assigning values to key variables in the main function like the previous example. Sometimes you might have to get your hands dirty and go through the code’s flow because the key variable is “lost” in the code’s logic. In these cases, extensions like r2ghidra3 are crucial to decompile functions and help a lot during the analysis. So functions like these:

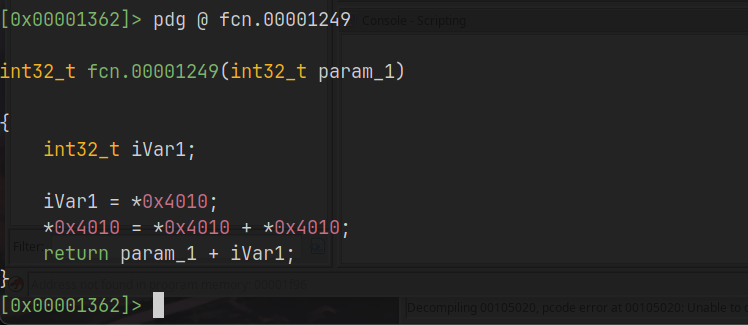
Can easily be decompiled to a high-level language, and it really helps. Even if I’m used to working with assembly language, switching to C language is quite comfortable and changes the view that sometimes could be worth the solution:

So as you can see, we have a parameter and another variable named with it both, but the function shows up a very interesting memory address. If you go into sections:

If you pay attention, the address presented in the decompiled function is 0x4010, and looking through sections, the .data section starts at 0x4000. This is where interesting things happen because radare2 can go through this section and print the content loaded at this specific memory address during the program execution workflow:


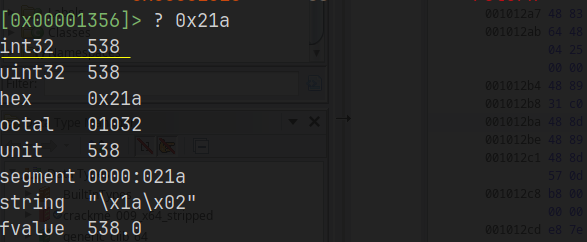
This is what interests me, knowing how a compiler organizes the sections in practice, how it’s loaded into memory and so on, and radare2 is amazing at doing this intuitively. By the way, it’s important to mention that radare2 is a framework and you might find auxiliary tools like rabin2 to get info about the file without loading it into memory, but to be honest, personally I prefer other tools like objdump which I’m more used to. Also, radare2 has a few very convenient tools that help to not break the analysis flow, like the hexadecimal calculator:

Navigating through visual mode
Navigating through radare2’s visual mode offers efficient methods for exploring binary structures. The g command, followed by typing an address or function label, allows for precise movement to specific locations within the code. This feature is particularly useful when analyzing complex binaries with numerous functions.
For those instances where backtracking is necessary, CTRL + u serves as a valuable tool. It returns the user to their previous location, facilitating a methodical approach to code examination. Conversely, should one need to revisit a forward position after backtracking, CTRL + i provides this functionality.
These navigation commands significantly enhance the ability to traverse the binary efficiently. They transform what could be a laborious process of manual scrolling into a streamlined exploration of the code’s architecture.

My setup:
For those who frequently work with radare2, taking the time to set up a well-configured .radarerc file can significantly streamline your reverse engineering process, making your workflow more efficient and tailored to your specific needs.
The .radarerc is a configuration file typically located in your home directory ~/.radarerc that radare2 reads upon startup. This file allows you to fine-tune radare2’s behavior to suit your preferences and workflow. Here is my .radarerc setup file:
e asm.cmt.right = true
e asm.pseudo = true
e scr.utf8 = true
e scr.utf8.curvy=true
e bin.relocs.apply=true
e bin.cache=true
e asm.lines = true
e anal.autoname = true
e asm.syntax = intel
e asm.comments = true
e anal.hasnext = true
e anal.strings = true
e asm.describe = true
eco gruvbox
Where it can be fit in a reverse engineering workflow:
I like to use this definition of Reverse Engineering workflow4, which consists of three phases:
Static: Where you will search for signatures, feature extractions, and whatever info that you might acquire without running the malware.Dynamic: Runs malware or file sample, with QEMU-based technologies or other technologies which allow you to properly see how the malware behaves during execution.Memory-dumping: Literally, after running the sample, collects the pieces that can serve as “evidence”.
Radare2 excels at the end of the Static analysis phase alongside Ghidra and during the very beginning of the Dynamic Analysis phase while doing a hybrid analysis, where statically we might have the code but provide input to feed the workflow and see what happens.
Nevertheless, Ghidra can be used on the Static part, it is very good in aspect of scalability and understand the code details in order to extract info from it. The navigation through it is more intuitive and practical which turns the analysis more convenient for large files.
Conclusion
Finally, radare2 is not a tool for you if you’re looking for fast results within a very short time period in doing some reversing; for this purpose, I would recommend Ghidra. It’s important to acknowledge that radare2’s learning curve can be steep. The tool demands a solid understanding of assembly, memory layouts, and binary formats. This complexity, while potentially intimidating for newcomers, is also what makes radare2 so powerful in the hands of those who learn how to use it.
But definitely, it is for you if you’re digging into the reversing world or are disposed to spend some time learning how it works; absolutely, it will be a very rewarding learning experience. It is not just a tool, but a comprehensive reverse engineering framework which helps you to better understand how reversing works.
Personally, I use radare2 to understand the code’s logic in general, as it forces you to navigate through it when you want to extract information. However, Ghidra remains my choice for understanding specific details of the code, such as where certain signatures are located and how they are being used. Thus, I prefer to use radare2 as a Swiss Army knife, allowing me to flexibly switch between static and dynamic analysis, giving me a panoramic view of what’s happening. For more robust and specialized analysis, Ghidra fits very well.
Therefore, both tools have their pros and cons. The last point worth mentioning is that they have their roles in Reverse Engineering Analysis, and despite having the same purpose, both offer different experiences that might contribute to the analysis overall. The key consists of knowing when to use each tool better. It is like reading a book or listening to an audiobook; in the end, you will know what the book is about.
Well, hope you liked it. See you soon and remember, keep reversing. ツ
– fr4mered